Wednesday, December 5, 2012

Paint out in Riverside today!

Cedar trees are so wonderful in the winter when most of the trees are missing their leaves.


We used the car to block the chilly wind.

Martin's painting.

Peggy's study.

This was a 'spur of the moment' paint out today.  The wind was whipping and chilly/cold in Parkville so we packed it up and drove to a park in Riverside.  A group of cedar trees caught our eye for a fast  hour and a half painting.

Saturday, December 1, 2012

MVIP Paint out in Lee's Summit

MVIP (Missouri Valley Impressionist Society) is doing a wonderful job stirring up lots of interest in artists gathering for plein air events.  One of our group, Debbie Payne, is now a member of MVIP.  Debbie invited me to join them for a paint out in Lee's Summit that final day of November when we had unseasonably warm weather.  The sun was shining and the temperatures were warm enough to shed jackets.  I counted about 6 painters in the location we painted in.  Here are a few photos from the morning.

Tammie Dickerson


Laura Kratz

My Soltek waiting for me.


Laura Kratz organized this event.  See her work at laurakratzart.com


Sunday, June 10, 2012

Congratulations is in order!

Congratulations to Debra Payne for placing an award in the Stems Plein Air Show this month. If anyone has a photo of her painting, please post it! Debra Payne also had a very successful show at the Brookside Art Festival in May. I expect we will be posting more exciting news for her in the future! Again, congratulations Debra Payne!

Paint out June 13

http://missourivalleyimpressionistsociety.com/ MVIS is having an open paint out event in Parkville on June 13. They are meeting at 173 English Landing Dr. If you are interested in more information, contact Cathy at: cathyklineartgallery@yahoo.com or check out MVIS at: http://missourivalleyimpressionistsociety.com/ If you haven't taken the time to check out their web page and information on this newly formed group, please do! MVIS is actively creating wonderful opportunities for plein air artist in our area.

Friday, May 18, 2012

Nocturnal Paint Out May 17th


#2 for Debbie.  The front of my house.

Our Airstream in the street light.
Debbie's #1 painting.  This is the porch across the street from my house.  I live on a cul-de-sac, so who would guess at 10:00pm there would be 3 cars driving on the street.  The neighbors that stopped said 'I never heard of anyone painting in the dark".  I guess it did look unusual to the average person in the 'hood'.  :)  I know Debbie will finish this for a beautiful painting.  We both agreed painting at night is awesome!  

This painting was done at Flying W Ranch in the Flint Hills a couple of weeks ago. A workshop full of artists and  I couldn't get any takers to paint with me!  

Paint Out Smithville Lake May 17

Sail boat cove


Smithville Lake has some very nice shelters at Sail Boat Cove.  The weather couldn't have been better.  Great little breeze and 80 degrees.

Debbie opted for a trail location.  They have wonderful bike trails as well.

Peggy took some 'artistic liberties' and moved some boats around, and painted the cove.

Tuesday, May 15, 2012

May 15- Paint out Parkville Park 9:00

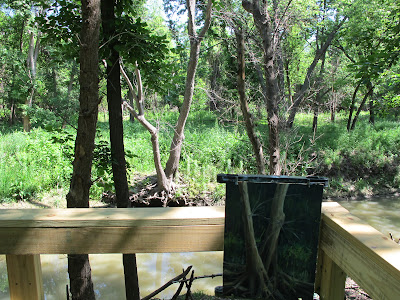
This was the anticipated scene, but the light was not what we wanted.

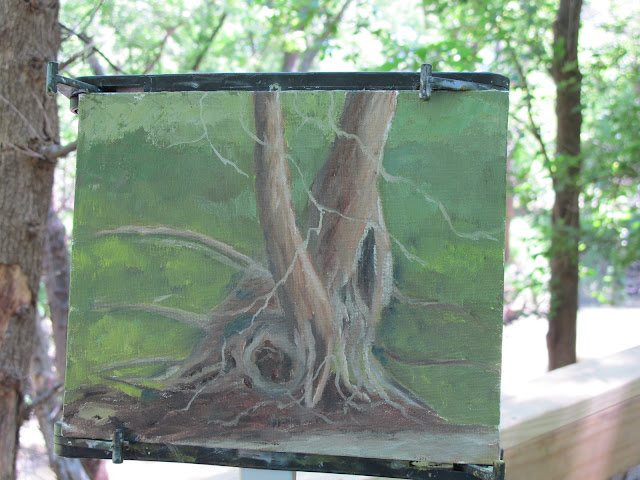
Walking down the trail that borders the creek, Martin found a great little deck overlooking the creek with this double tree complete with a mass of roots.

We both commented 'this is the kind of creek scene Josh Been likes'.  


Peggy's study.

Martin's study
This was the weather conditions the last time we painted in this location!  A little chilly that day.

Saturday, May 12, 2012

Brush Creek Art Walk


BRUSH CREEK ART WALK: a painting competition

JULY 27, 28 & 29

Everyone is invited!
Come out and walk the newly completed, nearly 4 miles of walkways along Brush Creek while classical musicians play and painters paint.
Painters will have three days to complete paintings on-site along the creek.  Artists will enter their finished paintings for a chance to show in the Gallery of Art at UMKC on August 23, 2012.

AWARDS

Best of  Show
4  First place $200
4  Second place $50
Total $1000.
 Honorable mentions.


ART OPENING RECEPTION

AUGUST 23, 2012
5pm - 7pm  UMKC Gallery of Art
The public is invited to view the Juried Paintings of Brush Creek on display.
Prizes will be awarded to winning artists and paintings will be for sale.

Brush Creek Walkways


Stroll the newly completed walkways!!
Our scenic riverwalk in Kansas City is nearing completion - only one connection remains to be constructed at Troost and it will be begin this fall.
Brush Creek has gone through a major transformation since the devastating flooding back in 1977.  Several new bridges have been built, the creek has been reshaped, and landscaping, walkways and fountains have created a beautiful greenway.
From Roanoke Road east to Elmwood, there is a near continuous trail along the creek.
See photos of the fountains along Brush Creek below.

Artists


Artists can register here to participate in this event.  Paintings will be painted entirely on-site, “en plein air” means “in the open air”, during the three day event.  Four zones have been designated along Brush Creek with prizes for the top paintings being awarded in each zone.

Friday, May 11, 2012

Opportunities for artist:


  1. http://www.westaf.org/artistsregisterblog/
  2. http://www.cac.ca.gov/artistcall/
  3. http://www.artcalendar.com
  4. http://www.artdeadlineslist.com
  5. https://www.callforentry.org/festivals.php?apply=yes
  6. http://re-title.typepad.com/opportunities/
  7. http://www.collegeart.org/opportunities/
  8. http://www.artshow.com/juriedshows/index.html
  9. http://www.artdeadlines.com/
  10. http://www.theartlist.com/
  11. http://southbendart.org/index.php?lt=1&p=see_exhibitionopportunities
  12. http://www.indplsartcenter.org/Exhibitions_and_Events/For_Artists/
  13. http://www.artperk.com/ListingSearchResults.aspx?lt=1
  14. http://www.artsconnect.com.au/callforartists/index.htm
  15. http://artistsregister.com/opportunities.phtml
  16. http://www.chicagoartistsresource.org/visual-arts/callforartists
  17. http://www.lacountyarts.org/
  18. www.wooloo.org
  19. http://www.asingularcreation.com/list.htm
  20. http://www.dezeen.com/
  21. http://www.callsforart.com/
  22. http://www.zapplication.org/shows.phtml
  23. http://www.juriedartservices.com/
  24. http://www.artandeducation.net/announcements
  25. www.artslant.com
  26. http://www.artandartdeadlines.com
  27. www.artsmarter.com
  28. http://www.artheals.org
  29. http://artisttrust.org/index.php/for-artists/opportunities
  30. http://bayareaartgrind.com/category/exhibition-entriescall-for-artists/
  31. http://www.unitedstatesartists.org
  32. http://losangelesartresource.wordpress.com/
  33. http://www.entrythingy.com/artists
  34. http://www.miraslist.com/
  35. http://www.azarts.gov/news-resources/arts-op/
These sites changes frequently!  If you have any ideas, please send them to me and I will be happy to post them.

Thursday, May 10, 2012


The article below was posted on the Oil Painters of America site.  To visit their site, you can click on the additional article to the right of this page!

Artists are always trying to save money and preparing your own canvas panels may be easier than you think.  After the Kim Casebeer workshop and 'round table' discussions on supplies, I thought it may be of interest to post an article on how to prepare your own panels.  Joshua Been also gave details on this subject during his workshop last summer in Salida, CO.  Miracle Muck product was mentioned in both classes.  Now is the time to order since it ships with 'weather sensitive' schedules.  SourceTek is one resource for purchasing Miracle Muck.  After a little research on Gatorboard, there are several sources to purchase it.  I have not tried to cut it, so I can not give advice or information on that process.  You can order it pre-cut from Art Supply (8 x 10 white for $1.48 each) or Foam Board Source for approximately $1.49 each.  If you venture to cut your own you can get the cost down to $1.09 at Artgrafix and a 30 x 40 sheet which will produce 12 panels of 8 x 10 and 4 of 6 x 10.  

The following article is in part from Oil Painters of America:
Commercially made linen or cotton canvas panels are available, and they are very nice. However, making them yourself will save you money and they really don’t take very long to make.  I will suggest pre-gessoed canvas.

 There are various surfaces to mount linen or cotton canvas to, depending on how light you want them to be. For this discussion we will 'think' Gator Board. Gator Board is similar to Foamcore, however the outer substrate of Gator Board is a harder material and will not bend, Foamcore will bend so it should never be used to mount canvas. Don't be confused and buy foam core, as it easy to buy at Hobby Lobby and Michaels.  Gator Board comes in various widths and in white, natural (tan) or black. If you are traveling and want a thinner panel you can use 1/8thinch Birch plywood, Masonite or Hardwood boards. I have seen regular hollow core door panels used successfully as well.  Another extremely light and thin option is Media Board sometimes called Non Buckle board. It is very thin and you can stack numerous paintings if you are going on an extended painting trip. When you get these panels back to the studio you can then support the Media board with a heavier backing or Foamcore when it’s time to frame the painting.
Note:
 I recommend that you start making small sizes at first 6x8 to 16x20 until you get the technique and drying time down, then you can better handle larger panels 18x24 and larger.

Materials you will need:


 A Roll of Pre primed Linen or Cotton Canvas
 I prefer linen but you can use cotton canvas if linen is too expensive.
 Gator Board (I use 3/16 inch Gator Board for smaller sizes and ½ inch Gator Board for large panels), Masonite or Birch plywood
Not Foamcore!
 To find Gator Board or Media Board/Non Buckle Board try an art supply store or on line.
For Masonite, Hard Board or Birch Plywood try your local lumber yard.
 Miracle Muck Glue
 Miracle Muck is water soluble (cleans up easily with water and it is also “heat re-activating”, which means that the low to medium heat of an iron or hair dryer, will allow you to peel up the canvas even after it has dried, if you need to remove the canvas from the board.

IMPORTANT! (be careful that the iron is not too hot or you can scorch your painting). Get a gallon of it from SourceTek. They will only ship when the outside temperature is safely above freezing. If they have a problem sending it, you can try your local art supply stores and see if they can get it.
 Small 5 inch wide foam-rubber house painting roller with reusable (green flocked) rolls
 These rolls may be sold separately. They give you a nice even smooth application of glue which is very important! Any paint store, or Hardware store should have it.
 Large Utility knife
 (I use the kind that has segmented blades that I can snap off when they are dull).
 Long metal straight edge for cutting

 Roll of Masking Tape

 Heavy Laminate Roller
 The kind that they sell for pressing down Formica to counter surfaces. Hardware stores carry them.
 Paper Towels

The Procedure:

Step 1
 With a pencil, mark the Gator Board a bit larger than you want the finished panel to be.Example:
  • For an 8x10 inch panel cut it to 9x11 inches.
  • For small canvases an additional 1/2 inch all the way around is fine.
  • For larger sizes I recommend 1 inch all the way around. After the canvas is glued down and dried, this makes a nice, clean edge once the excess is trimmed off. However, if you have pre-cut boards to the exact size and don’t have any excess trim, it is not a problem.

 Using the pencil lines for a guide, cut out a piece of Gator Board with the utility knife and metal straight edge. Make several passes of the blade until it cuts all the way through. If you are cutting Masonite or plywood, you may need a table saw to cut the material.

Step 2
 Cut a piece of Canvas to the same size as the Gator Board in Step #1 and lay them side by side.

Note: If you cut the canvas from a roll, you might have to tape down the corners so it doesn’t curl up when you apply the glue.

Step 3
 Pour some Miracle Muck out onto the raw side of the canvas and work it evenly into the canvas with the foam roller to get a thin and even coat with no puddles or dry spots.

IMPORTANT: You want a thin, even coat of glue rolled out from edge to edge.

Step 4
 Pour a small amount of the Miracle Muck from the bottle onto the Gator Board.
 Using the foam roller, roll out the glue evenly over the entire surface of the Gator Board. You won’t need to pour out as much glue because the board is not as absorbent as the canvas. (Make sure that there are no puddles or dry areas on the surface).

IMPORTANT: You want a thin, even coat of glue from edge to edge.

Step 5
 Take the glued Gator Board and flip it over onto the glued canvas surface adhering glue side to glue side. You must do this while the glue is still wet. You will still be able to slide it around or lift up the board to adjust it if necessary.
 Line up all the edges as best you can, so when mounted, the weave of the canvas is not crooked. Press lightly over the Gator Board with your hands so that both glued surfaces make good contact.
 Then, turn the panel over to the canvas side (removing the tape from the corners of the canvas).
 Gently pressing down with your hand again, (this time on the canvas side) starting at the center and moving toward the outer edges, smooth out any air bubbles that might still be between the canvas and board.

Step 6
 Take the heavy roller and bray down the canvas to the board (roll from the center out to the edges again).

Step 7
 When the mounted canvas is flat and smooth, turn it face down and put some books or other heavy flat object on top to keep the panel flat over night. Be sure to weight the whole surface.


Step 8
 The next day you can trim off the excess ½ inch of material from the panel with the utility knife. Trim them to the finished size you want. It may take several passes to cut through but you will get a nice clean edge.
Once you do it a few times and get the feel of how much glue to use it should be a breeze to make a bunch at a time with no problem.


2010
Free Ways To Promote Your Paintings
Making Your Own Linen Panels
Allen Duerr & Harley Brown Interview
Moving Beyond the Receipt Shoebox
Framing: Choosing, Fixing & Shipping
2009
Packing Paintings for Galleries and Shows
Artistic Goals: The First of Three Elements of One Artist Goal Plan